Lucid Software is the leader in visual collaboration and work acceleration, helping teams see and build the future by turning ideas into reality. Its products include the Lucid Visual Collaboration Suite (Lucidchart and Lucidspark) and airfocus. The Lucid Visual Collaboration Suite, combined with powerful accelerators for cloud and process transformation, empowers organizations to streamline work, foster alignment, and drive business transformation at scale. airfocus, an AI-powered product management and roadmapping platform, extends these capabilities by helping teams prioritize work, define product strategy, and align execution with business goals. The most used work acceleration platform by the Fortune 500, Lucid's solutions are trusted by more than 100 million users across enterprises worldwide, including Google, GE, and NBC Universal. Lucid partners with leaders such as Google, Atlassian, and Microsoft, and has received numerous awards for its products, growth, and workplace culture.
In a recent blog, we showed off some examples of Angular pipes we use in our code base. Now, we’d like to talk about directives. Angular directives allow you to attach behavior to elements in the DOM and reuse it across your project. The framework already comes with a number of convenient directives like NgStyle, NgIf, NgFor, and NgSwitch. We’ve written over 65 custom directives so far and would like to share the top five that we think you’ll find useful in your project. Just note that the directives in the demos below were intentionally distilled to bare minimum for clarity and don’t have extensive customization options or destructors/cleanup code. Use them as a starting point.
#1 Callout
Virtually no application goes without callouts or tooltips, which are small popup elements providing more detail about their owner.Here is a minimal example of a callout directive that dynamically creates a callout component with specified text when you hover over an element:The CalloutComponent used in this demo is created on the fly usingviewContainer.createComponent() and destroyed when the mouse leaves the element. Here we insert the callout immediately after the element that the directive is applied to (this is where the injected ViewContainerRef points to). For more elaborate configuration options, see our earlier article on building Angular components on the fly.
#2 Deep disabled
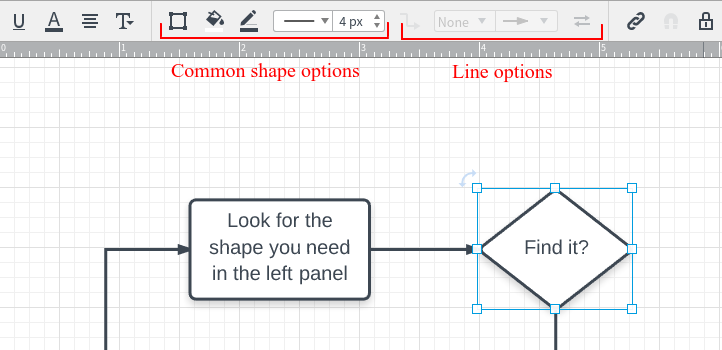
In larger applications, it’s not uncommon to disable entire groups of UI elements as the state changes. For example, the Lucidchart editor dynamically enables and disables certain tool groups depending on what shapes are currently selected:Fragment of the Lucidchart editor. Line options are disabled because a block is selected.Instead of repeating the expression for disabled state on each individual component, we can make a special disabled directive that will cascade down the disabled state from one of the parent components.Let’s prototype this:Most of the “magic” here is actually done by Angular’s dependency injection framework:
This line in the constructor of the directive means “inject the nearest parent DisabledDirective, skipping myself, if there is one.” Now, during the change detection cycle, we will check not only the boolean value of the current directive but the parent too:
After implementing the directive, we update the code of our components like form fields and buttons to be aware of it (again using the dependency injection mechanism).
While this directive is quite simple, it reduces code duplication and allows us to toggle areas of the UI on multiple levels without any explicit communication between components.We also added the ability to disable the cascading of the disabled state on select elements (like the Fullscreen button in the demo above) via the disabledStopPropagation attribute.
#3 animatedIf
*ngIf is perhaps one of the most widely used built-in Angular directives. But what if we want to use animation to toggle components in our app? The following directive extends ngIf to support The directive simply toggles the showing and hiding classes on the container element and assumes that the animation is done via CSS which provides great flexibility—you don’t have to touch the directive code to change animation.
The demo implements a simple fade animation, but it can easily be tweaked to be slide or grow/shrink or any combination of them. The animationEndSafe function is simply a wrapper around a listener to the animationend event that calls the callback after a specified timeout if the event hasn’t fired. This is to ensure that the code doesn’t get “stuck” in case the container element doesn’t have any animation defined on it.
#4 Window resize thresholds
CSS3 Media Queries (technically called media features) greatly simplified responsive design for web developers, allowing us to alter page layout based on features like screen size, orientation, and pixel density. In Angular world, however, a significant part of the app’s UI rendering is taken over by the framework.The following directive lets you define a series of window width “breakpoints” and alter the template when transitions between the thresholds happen.The directive listens to Window’s resize event through the convenient host binding:
The only other technicality worth mentioning is that whenever you’re listening to DOM events that may fire frequently like resize or mouse movement, make sure to debounce your event handler so that it doesn’t execute an excessive number of times, creating unnecessary CPU load. Many third party libraries contain a debounce function, but we included our implementation in the demo:
There is a native autofocus attribute in HTML5 spec for automatically focusing form fields upon page load. For example, this provides developers with an easy way to focus the login form on a page, saving the visitor the time to click on an input field before they can start typing in their credentials. However, the attribute won’t work in an Angular app where the framework builds the DOM dynamically. This directive is the Angular equivalent of the autofocus attribute. What are the directives you use often in your projects? Share in the comments.