So you want to build an add-on for Google Docs, Sheets, or Slides, but you’re worried about ending up on the highway to development hell? You’ve come to the right place, then. As someone who has been down that road before, I’d like to share some of the mistakes, missteps, and blunders I’ve either fallen victim to or narrowly avoided, what I’ve learned from them, and how you can chart a course through the Google Apps Script add-on development process that bypasses them completely—without having to program in Vigil. In particular, I've focused on things you might consider doing to save time or effort that will end up costing you dearly. I realize that there are traditionally seven deadly sins, but I couldn’t think of a seventh that was sufficiently sinful, so we’ll have to go with six. Let’s get started:
#1: Coding your Google Apps Script add-on in the built-in script editor
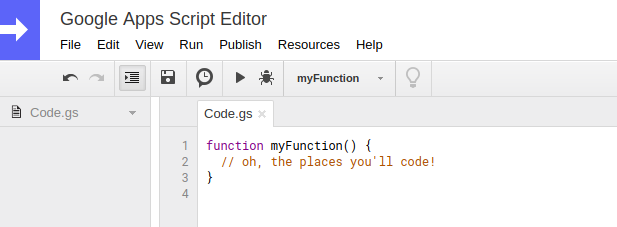
It’s always a chore doing the prep work necessary to be effective in a new environment when all you really want to do is jump in with both feet and start experimenting with APIs, and starting a new Google Apps Script add-on is no exception. That’s what makes the built-in script editor so tempting: you don’t have to set anything up or read any documentation. You can just click “Tools > Script editor” and then jump in and start coding immediately. However, like most temptations, it comes with a heavy cost later on. The built-in script editor offers minimal source control options, bare-bones search functionality, and a text editor that will get the job done but lacks quality-of-life features like automatic closing parenthesis insertion and simultaneous multiple line indentation. It’s certainly enough to get small projects working, but once you are dealing with more than a handful of files, you will eventually reach your breaking point, and that’s when the second temptation will kick in.
It's a trap!
“Why not just do my work in <IDE of choice> and then copy-paste it to the script editor afterward?” you’ll ask yourself. Well, I’ll tell you why: the fact that you’re asking yourself this means that you’re dealing with a nontrivial degree of complexity. Otherwise, you could tough it out for 30 more minutes and be done with it. That complexity means you should be using professional-grade source control and good engineering practices instead of hacking away and hoping for the best while trying to remember which files have, and have not, been copy-pasted recently. Luckily, you can avoid this entire mess—and keep using your favorite IDE—by using the Google Drive REST API to import and export your code instead. It’s a lot like using file-by-file copy-paste, except it makes the computer do all the boring and repetitive parts that are vulnerable to human error. In fact, if you set up git hooks that upload your changes automatically, it will be no different than a typical feature branch workflow (don’t forget to squash). So make sure you set this up at the very beginning. I promise you won’t regret it.
#2: Hardcoding app-specific strings and API calls
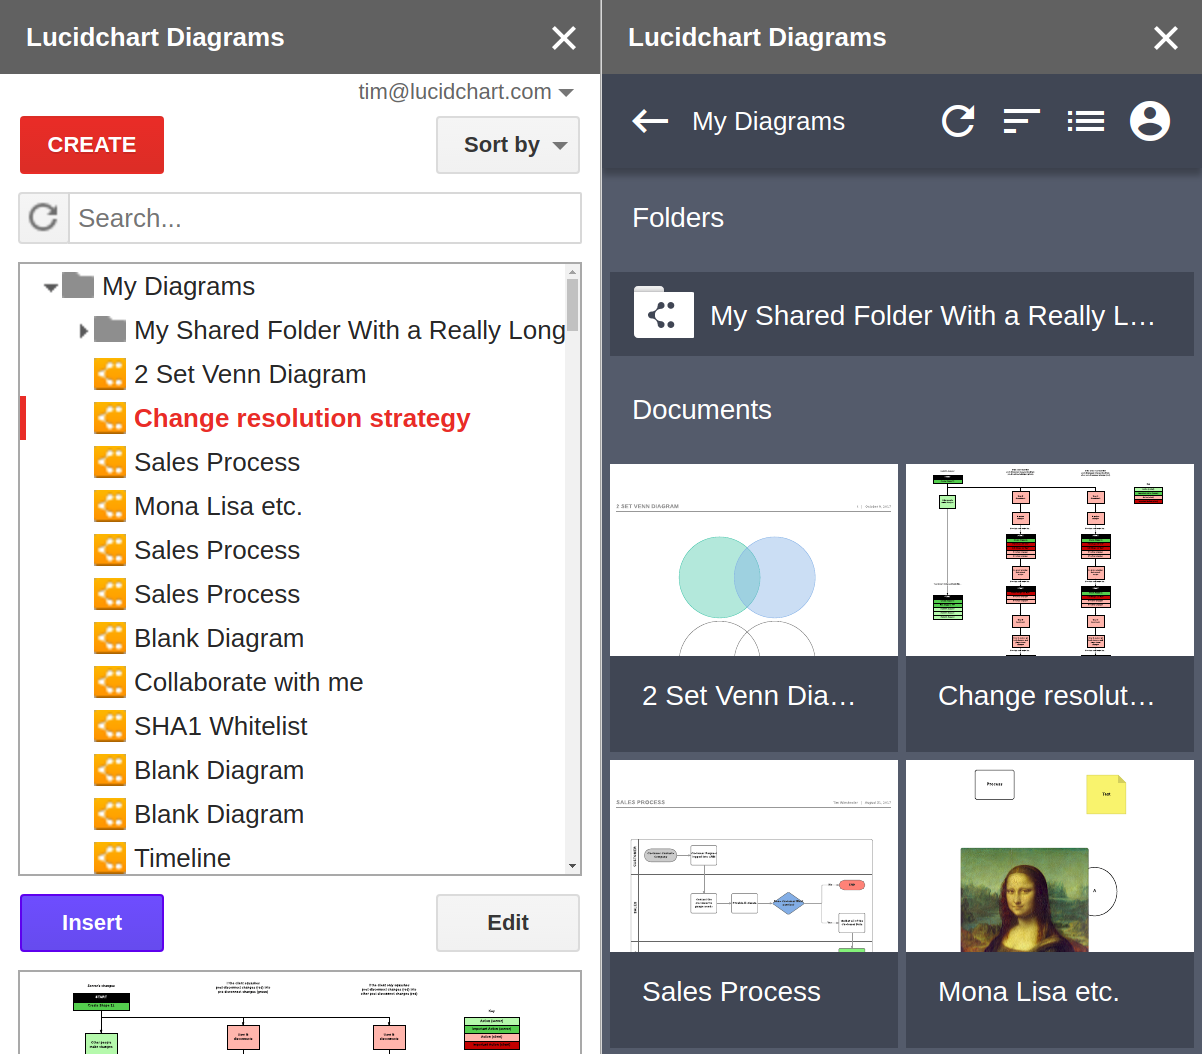
Unless your Google Apps Script add-on’s purpose is extremely specific to Sheets (for example), you will eventually want to port it to Docs. Or even if it will never be ported to another G Suite app, you may want to release translations of it in Spanish, French, German, and Chinese. If you’ve hardcoded every string relating to spreadsheets, you’ll have to hunt them all down to hand them over to your translator and then manually put them back in. If you’ve hardcoded every API call to SpreadsheetApp.getThing().getOtherThing().getWidth(), then you’ll have to replace it with DocumentApp.getDifferentThing().getWidth() all throughout your codebase. Or if you update the UI for one of multiple add-ons that are basically the same, you will have to move those changes over very carefully to make sure you don’t break anything in the other add-ons—which you probably weren’t thinking about very hard when making the updated UI.
Original UI in Docs/Sheets/Slides (left); redesigned UI in Docs/Sheets/Slides (right)
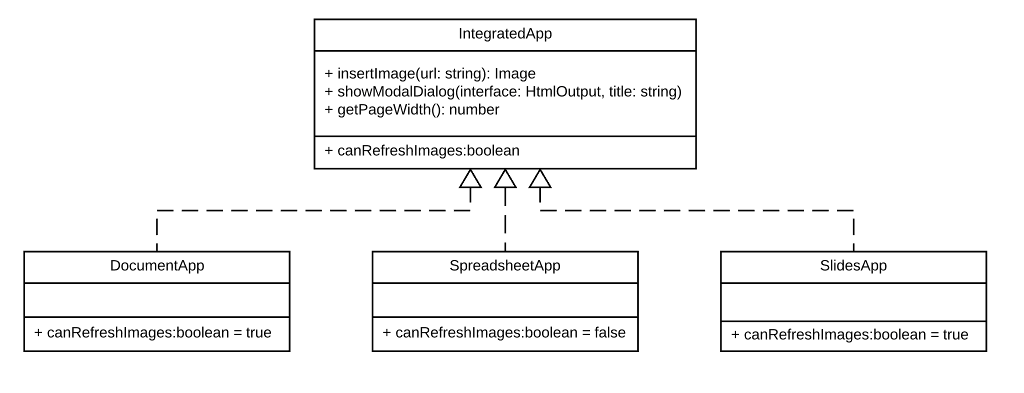
On the other hand, if you had started with a wrapper object that abstracted away which specific G Suite app the add-on was for and an i18n object to hold all user-facing strings, then porting or translating your add-on would be much easier, faster, and less error-prone. I ended up calling my wrapper object IntegratedApp, and all it really did was provide a common interface for the rest of my code to use without caring about which app it was for. Instead of making the above SpreadsheetApp and DocumentApp calls, I would just call IntegratedApp.getThingWidth() and then define what that meant within the IntegratedApp wrapper object to match the application using it. This way, all code could be shared between add-ons, with the sole exceptions being a configuration file and the file defining IntegratedApp. Because it’s easiest to develop using a wrapper if you start doing so from the beginning, I recommend doing just that.
UML class diagram showing the relationship between IntegratedApp and Docs/Sheets/Slides
#3: Only testing in AuthMode.LIMITED
This one is easy to forget because most of your work in a Google Apps Script add-on will be based on the functionality that is only available after the add-on has been enabled, which naturally means that most of the time you’ll be in AuthMode.LIMITED. Unfortunately, most of your new users will not be.
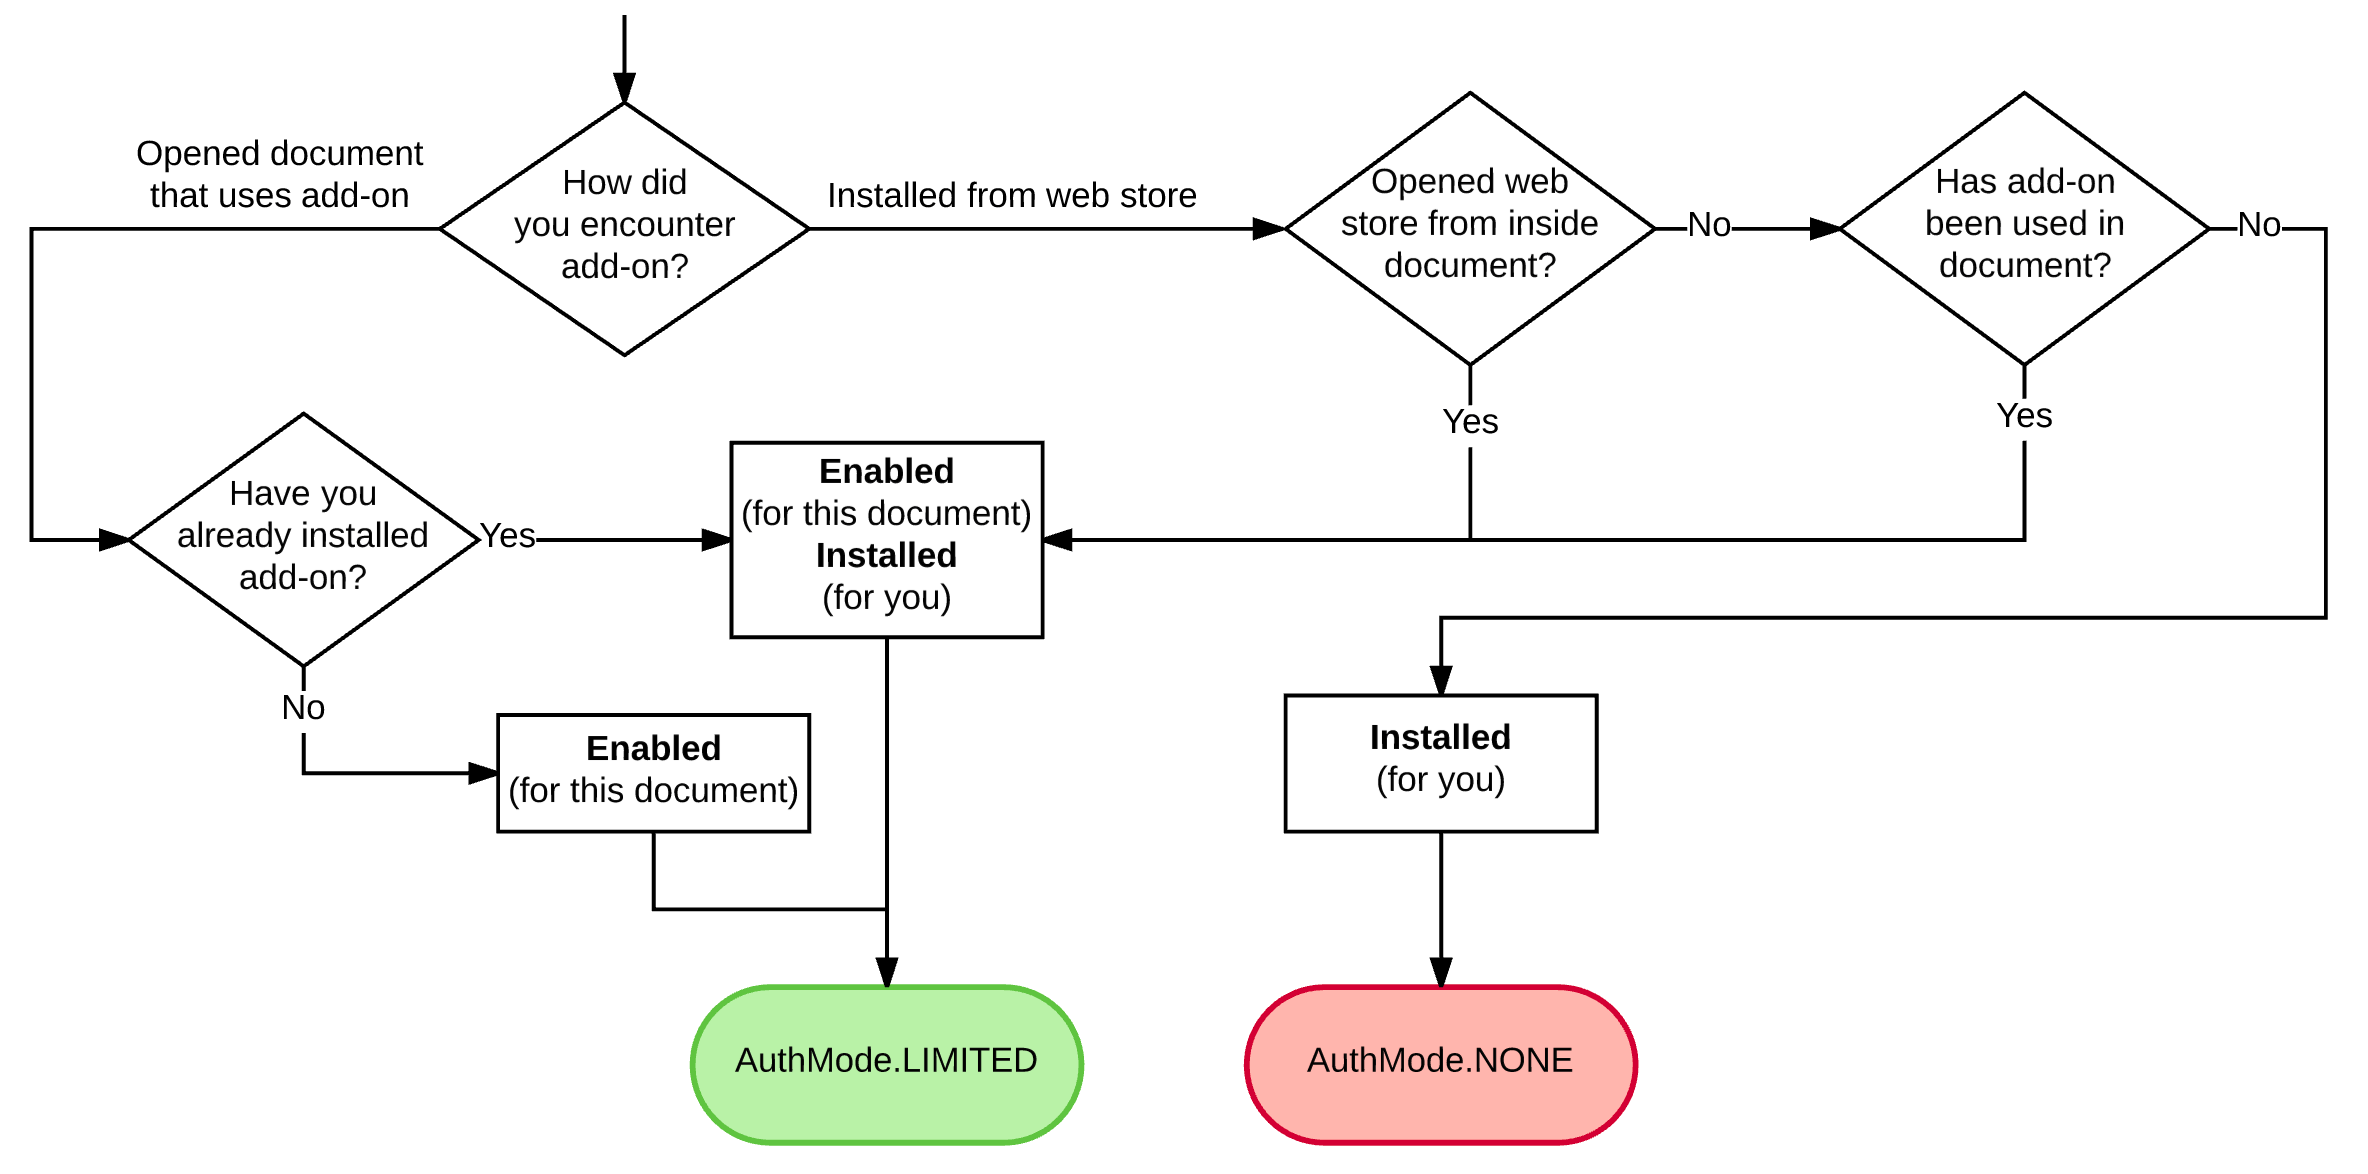
Determining your authorization mode using the Google Apps Script Add-on lifecycle
Check out the Google Apps Script add-on authorization lifecycle, and you’ll see that until a new user enables your app—even if it’s already installed—your onOpen() script will be running in AuthMode.NONE. So if your onOpen() does something that can only be done in AuthMode.LIMITED or higher, you’ll spend the first day of your Google Apps Script add-on’s launch scrambling to rewrite every violating function so your users can actually use your add-on. In my case, I was calling getActivePresentation() in order to set up some function bindings for my IntegratedApp object. Since I wasn’t actually trying to do anything to the document before I was allowed to, it was simple to wrap that call in another function instead of setting the bound function directly as a property of the wrapper, ensuring it would be evaluated after the add-on had been enabled instead of immediately upon onOpen’s execution.
This defers executing SlidesApp.getActivePresentation() until IntegratedApp.getPageWidth() is called
Fortunately, it’s easy enough to make sure you catch this problem before release by putting “test for brand-new users” in your QA specification and (even better) testing while you develop by using “Run > Test as add-on” in the script editor to create a test case that starts in AuthMode.NONE.
#4: Not separating your HTML/JS/CSS
Google Apps Script add-ons only support two file types: .gs and .html. The .gs files are written in Google Apps Script (which is pretty close to Javascript with the name filed off) and run on the backend. These aren’t usually the source of this problem. As you might guess, the .html files are written in HTML and make up your add-on’s front-end. Seeing that you’re coding directly in HTML may bring you back to the days of using HomeSite to write DHTML and lead you to bundle related HTML, CSS, and JS together in one file. After all, you don’t have the option to include .js and .css files, right? Technically yes—but practically, there’s a way around this limitation.
Although you can’t include .js and .css files directly, there’s nothing stopping you from creating .html files that function as if they are .js and .css files. Wrap your JS in a <script> tag, and voilà! You’ve got valid HTML. Wrap your CSS in a <style> tag, and you’ve got valid HTML. You can even use .js.html and .css.html in your filenames to make it perfectly clear that while this is an “HTML” file, it’s really a JS file. Then in your actual .html file, you can include your JS and CSS by using printing scriptlets like the following:
The '.html' in the file name is implicit—no need to include it here
Note that there are XSS security concerns to take into account when you are using force-printing scriptlets (which the above are), so be sure to read up on them before using them. In many cases, regular printing scriptlets will serve you just fine. Understanding printing scriptlets and using that knowledge to separate your styles, DOM, and business logic only takes a little bit of reading and a little bit of work, but when you end up having to restyle your add-on, you’ll be glad you have a clean division between your styles, scripts, and HTML.
#5: Failing to understand environment restrictions at design time
Writing an add-on for G Suite is very similar to normal web development, but there are some things you could do on a normal web page that are just not possible in an add-on. It’s important that you understand these limitations before beginning development, and it’s just as important to convey them to your UI/UX designer before they start making mocks. It’s easy to think (for example) that you can put a contextually-captioned button in the title bar of your sidebar add-on, but it turns out that you can’t. If your mocks depended on that functionality being available, it’s back to the drawing board. While I cannot give an exhaustive list here of cans and cannots, I will explain a few, and I will note that the dialog guide and the add-on style guide will probably be useful to your designer.
Firstly, you cannot violate the borders of the iframe sandbox, and all sandboxing is done in iframe mode. Try as you might, you will not be able to throw a div into the middle of the page to make a beautiful image selection modal dialog. You have to instead use the dialog options that the UI API provides.
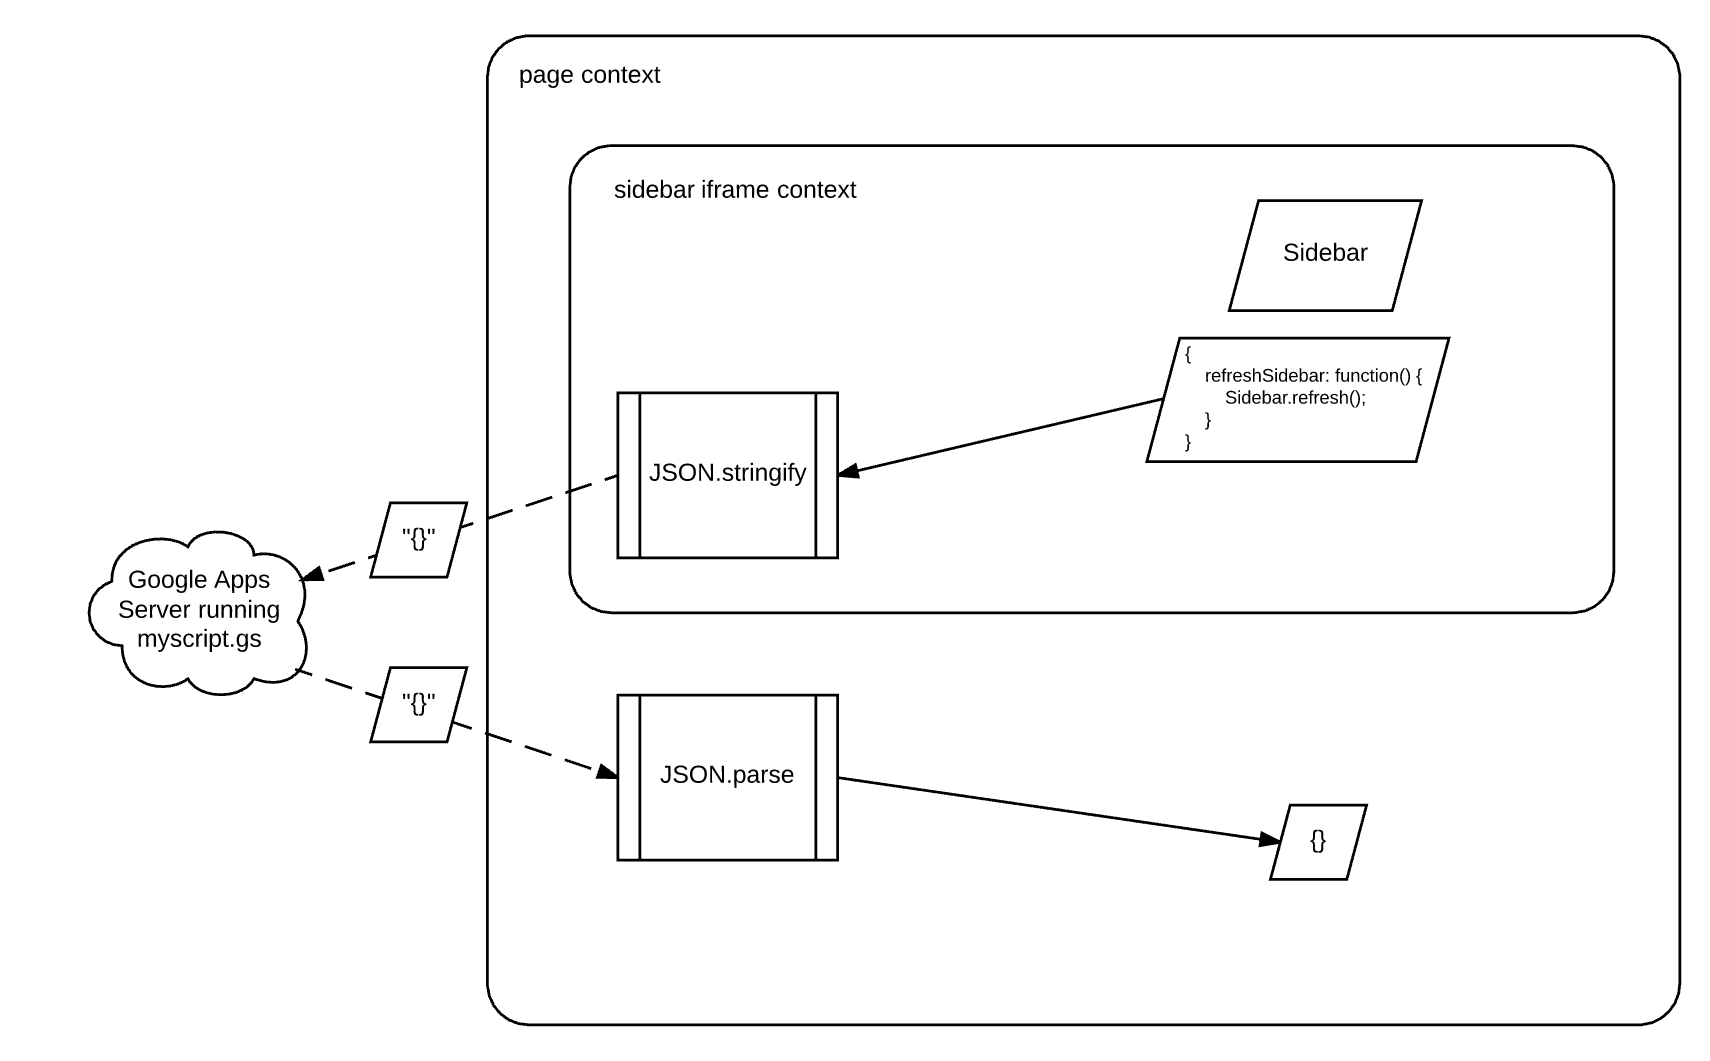
Secondly, paying close attention to the UI API will reveal that all calls to it come from your .gs files (which run on Google Apps Script servers), which means that a modal dialog created by your sidebar is actually created by your .gs backend script messaging Google’s frontend UI service in the browser. So if you pass in a JSON object full of functions that can affect the sidebar as a creation parameter of the modal, you will find that they will not be able to affect the sidebar through closure. This is because in order to pass that JSON object to the modal, you serialize it and send it to Google’s servers in a request, and then it gets deserialized on its way back to Google’s UI service, which uses the deserialized JSON to create the modal. The serialization/deserialization destroys any notion of closure on the JSON’s functions. You can use printing scriptlets to pass information from the sidebar to the dialog at its time of creation, but after that data flow between the two is limited to dialog events the backend will be listening for and backend functions explicitly invoked from the dialog using google.script.run.
The function we want to use to affect the sidebar via closure doesn’t make it past JSON.stringify()
Finally, new Google Apps Script add-ons must comply with Google’s Material Design look and feel. You won’t be completely prevented from developing your add-on if you ignore this requirement, but you’ll have a bumpy road to travel in order to get it approved for release. Even if (as in my case) the Docs and Sheets versions of an add-on use an older, non-Material UI, your new add-on still has to use Material. With that said, the resources for Material Design are pretty nice to work with, so this particular restriction is not too painful as long as you know about it from the beginning.
#6: Delaying marketing materials until after submission for review
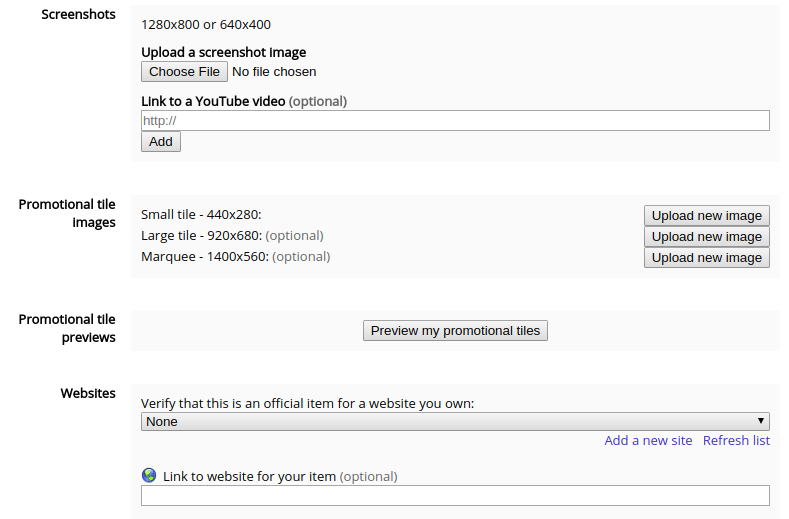
As engineers, it’s easy to dismiss marketing as “fluffy ‘people stuff’” and assume that your marketing department can spin up anything you need on short notice. Or, if you’re going it alone, it’s easy to think, “once I have the add-on working, I’ll submit it to get the functionality approved, and I’ll write up my promotional text while I wait for approval.” However, as you will find at 11:30pm on your submission deadline date, you can’t actually submit your add-on for approval without creating its webstore entry, which means submitting marketing materials. You can throw in dummy blank thumbnails and Lorem Ipsum text to make the forms submit, but you will have to get your add-on reapproved once you’ve put real images and text in, and all the while, your add-on will be not be in the webstore (if you’re lucky), or it will be in the webstore with nonsense text and blank images (if you aren’t so lucky). Save yourself the headache and get your media assets prepared long before your deadline.
A small part of the webstore draft form you must complete to submit your Google Apps Script add-on
Conclusion
You may have noticed that the common theme running through my recommendations is “prepare in advance.” This was not an accident. Easily the biggest difficulties in software development come from not thinking things through until a serious problem has reared its head, and add-on development is no exception. But if you are patient and do the unglamorous legwork first, you will find that writing Google Apps Script add-ons is actually quite enjoyable, and a well-prepared engineer has nothing to fear from them.
As for me, surviving the mistakes and near-mistakes I encountered over the course of developing my Google Apps Script add-on was a rollercoaster, but completely worth it. I was able to be a launch partner for the announcement of Google Slides add-ons, and since then, our add-on has racked up almost 20,000 individual installs.
About Lucid
Lucid Software is the leader in visual collaboration and work acceleration, helping teams see and build the future by turning ideas into reality. Its products include the Lucid Visual Collaboration Suite (Lucidchart and Lucidspark) and airfocus. The Lucid Visual Collaboration Suite, combined with powerful accelerators for cloud and process transformation, empowers organizations to streamline work, foster alignment, and drive business transformation at scale. airfocus, an AI-powered product management and roadmapping platform, extends these capabilities by helping teams prioritize work, define product strategy, and align execution with business goals. The most used work acceleration platform by the Fortune 500, Lucid's solutions are trusted by more than 100 million users across enterprises worldwide, including Google, GE, and NBC Universal. Lucid partners with leaders such as Google, Atlassian, and Microsoft, and has received numerous awards for its products, growth, and workplace culture.