Define sensitive data and enable content inspection
First, we recommend enabling content inspection to begin scanning all documents in your account for sensitive content. This process is invisible to end users: It runs in the background and only flags potential matches to predefined sensitive categories for admins to review. No one else will see these detections. See the list of the sensitive categories and infotypes that Enterprise Shield regularly scans for.
Second, identify which sensitive categories or infotypes are most relevant to your account. You can customize content inspection to focus only on the categories or infotypes that align with your security and compliance priorities. Additionally, you can add custom infotypes that allow you to scan for proprietary keywords, project names, or phrases unique to your organization.
The types of data considered sensitive can vary by industry, but here is a general guide for available sensitive categories and infotypes that may be applicable.
| Industry | Recommended sensitive categories |
| Healthcare |
Health Personally identifiable information (PII)* US-specific PII
|
| Financial/Banking |
Financial & Banking Data (F) Personally identifiable information (PII)* US-specific PII
|
| Technology |
Technical Credentials & Tokens (T) Mobile & Network Identification (N)
|
| Regulations |
General Data Protection Regulation (GDPR) Japan Act on the Protection of Personal Information (APPI)
|
*The Personally Identifiable Information (PII) category includes a PERSON NAME infotype, which can generate a high number of results, especially when author names appear on sticky notes. If your content inspection results seem unusually high, you can consider turning off this infotype to reduce noise.
For more information on content inspection, visit the Enterprise Shield add-on overview in the Lucid help center.
Review inspection results
Once the data begins to populate from the content inspection, review the findings with these steps:
- Select Content inspection from the expanded left-hand menu.
- Click the Results tab at the top of the page.
From here, you can review any detected sensitive data matches by document. The title, owner, and any classifications associated with the document are represented. You can also see which sensitive categories appear within the content of the document, as well as the number of sensitive data matches, by selecting the document title.
Use filters at the top of the report to determine which sensitive categories and/or infotypes you see, which levels of access, etc. Pay close attention to the external access filter. This filter will highlight sensitive documents that are shared with external users. To help identify leaks of your proprietary corporate keywords, filter your report by the "Custom" policy and "Custom" infraction type.
Set up classifications, auto-classification, and controls
Now that you have inspected the content on your Lucid account for sensitive data, it’s time to categorize and regulate what users can do with sensitive information. Your first step is to configure your account’s classifications on the Compliance > Attributes tab.
Lucid recommends at least the following document classifications:
- Private or confidential: This type of document contains restricted information, and any collaborators should be given access individually as needed.
- Internal: This type of document should be accessible to company employees but not shared externally.
- Public: This type of document can be shared freely with no restrictions.
You can customize classifications to fit your needs, though most customers align them with their company’s internal security classification policies.
Once your classifications are in place, enable auto-classification to automatically classify documents based on sensitive content detected by your content inspection policy.
Note: Classifications are listed in top-down order, from most restrictive at the top to least restrictive at the bottom. This order matters: If a document contains multiple sensitive categories, the highest-ranking classification in the list will be applied.
In the Classification table, use the Auto-classification column to map sensitive categories to specific classifications. For example, any file that was detected as containing PII can be automatically classified as “Private” and have sharing restrictions applied via classification controls. To learn more about auto-classification, check out this community post.
Classification controls are the next step in protecting sensitive data. These controls enforce restrictions, such as external sharing, exporting, or printing, based on a document’s classification level. With the Enterprise Shield add-on, you can attach controls that will disable:
- External sharing of documents both via email or via link to anyone outside your Lucid account
- Replication of documents and the content within, including duplication, copying, or moving of content within Lucid documents
- Publishing of documents
- Exporting of documents
- Printing of documents from within Lucid
Lucid recommends using all of these controls for highly sensitive documentation. Once you set these controls, they will be applied to any documents given the associated classification.
Any of these actions completed prior to a classification control being set remain unaffected, and existing collaborators will not be removed. However, you can still revoke access to select documents or folders from any external users using these instructions.
Here is just one example of how you can use auto-classification and classification controls to protect your sensitive data:
Classification: Private
Controls: disable print, disable replication, disable export, disable publish, disable external shares
Auto-classification: GDPR, Health, Financial, Credentials & tokens, Custom infotypes
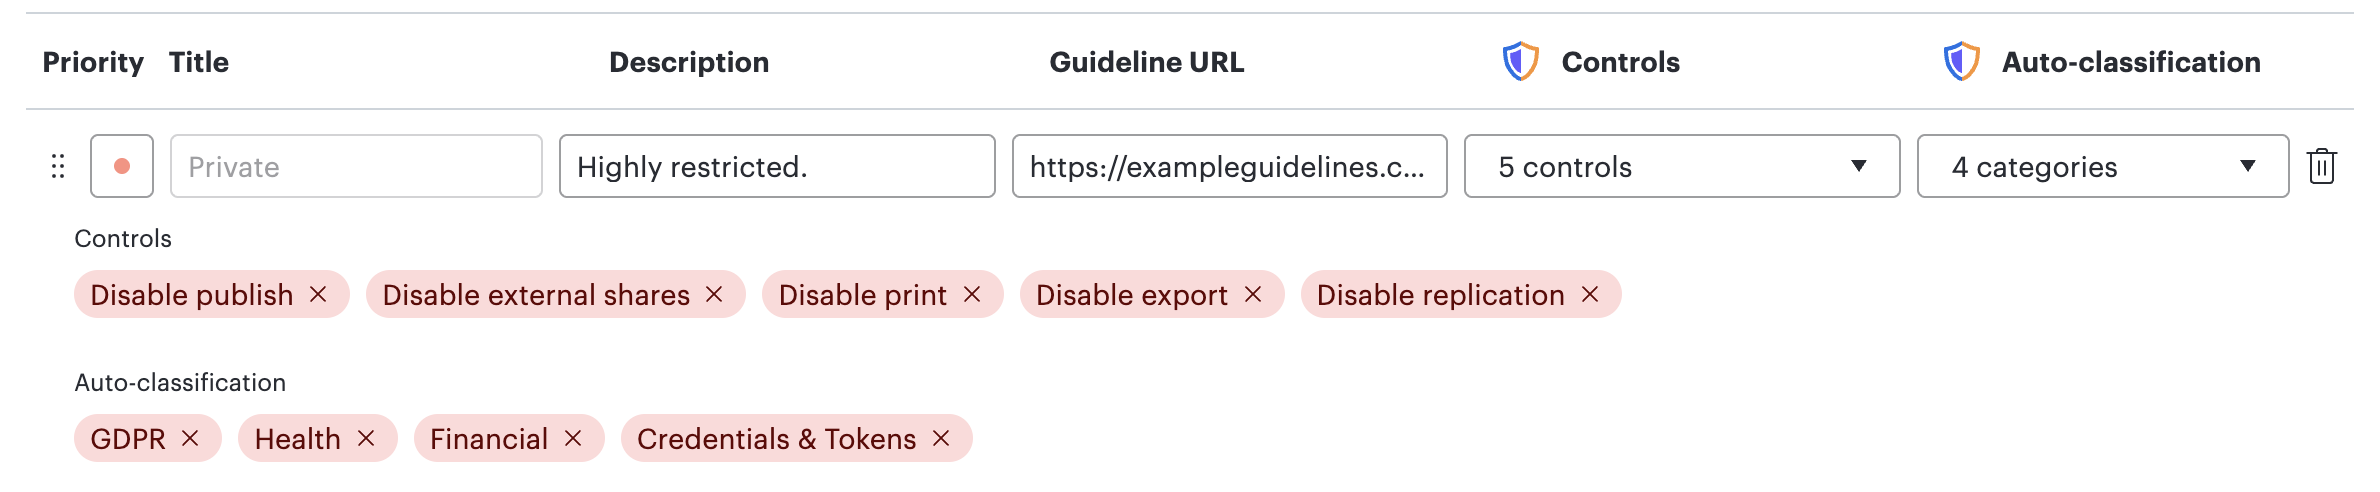
Any document containing detections related to GDPR, Health, Financial data, Credentials & Tokens, or your company's Custom Infotypes will automatically be classified as “Private.” With this classification in place, users are restricted from printing, duplicating content, exporting, publishing, or sharing the document externally. As an admin, you don’t need to take any manual action—Lucid automatically detects and applies these protections to your sensitive data.
If you want to ensure that all documents on your account are classified, use our classification requirement feature. Require classifications for all new documents created on your account. Users will be unable to select "No classification" for new and existing documents. For past documents, you can use Clean up classifications of existing documents by using the bulk classification action in Document Discovery or Content Inspection.
If you want to ensure that all documents on your account are classified, use the require classification feature. This enforces classifications on all new documents and disables the “No classification” option for users. To update existing documents’ classification, filter by “No classification” in document discovery or content inspection, and then use the bulk action menu to select “Edit classification.”
For more information on custom account classifications, auto-classification, classification controls, and require classification, visit our article on compliance settings in the Lucid help center.
Block personal Lucid logins on a corporate network
Our block personal account feature restricts authentication on your corporate network to allow access only to your primary Lucid corporate account, effectively blocking any personal account logins within the network.
Blocking personal account access on the corporate network helps protect against data exfiltration by preventing users from logging into their personal accounts, where they could upload, share, or transfer sensitive corporate data outside the organization. Restricting access only to approved corporate accounts reduces the risk of employees deliberately or accidentally moving confidential information to unsecured or unmanaged personal environments.
Note: These guides are here to help you get the most out of Enterprise Shield but are not intended to address all scenarios or compliance requirements. You’re in the best position to decide how to configure your settings to ensure they meet your specific security and privacy needs.