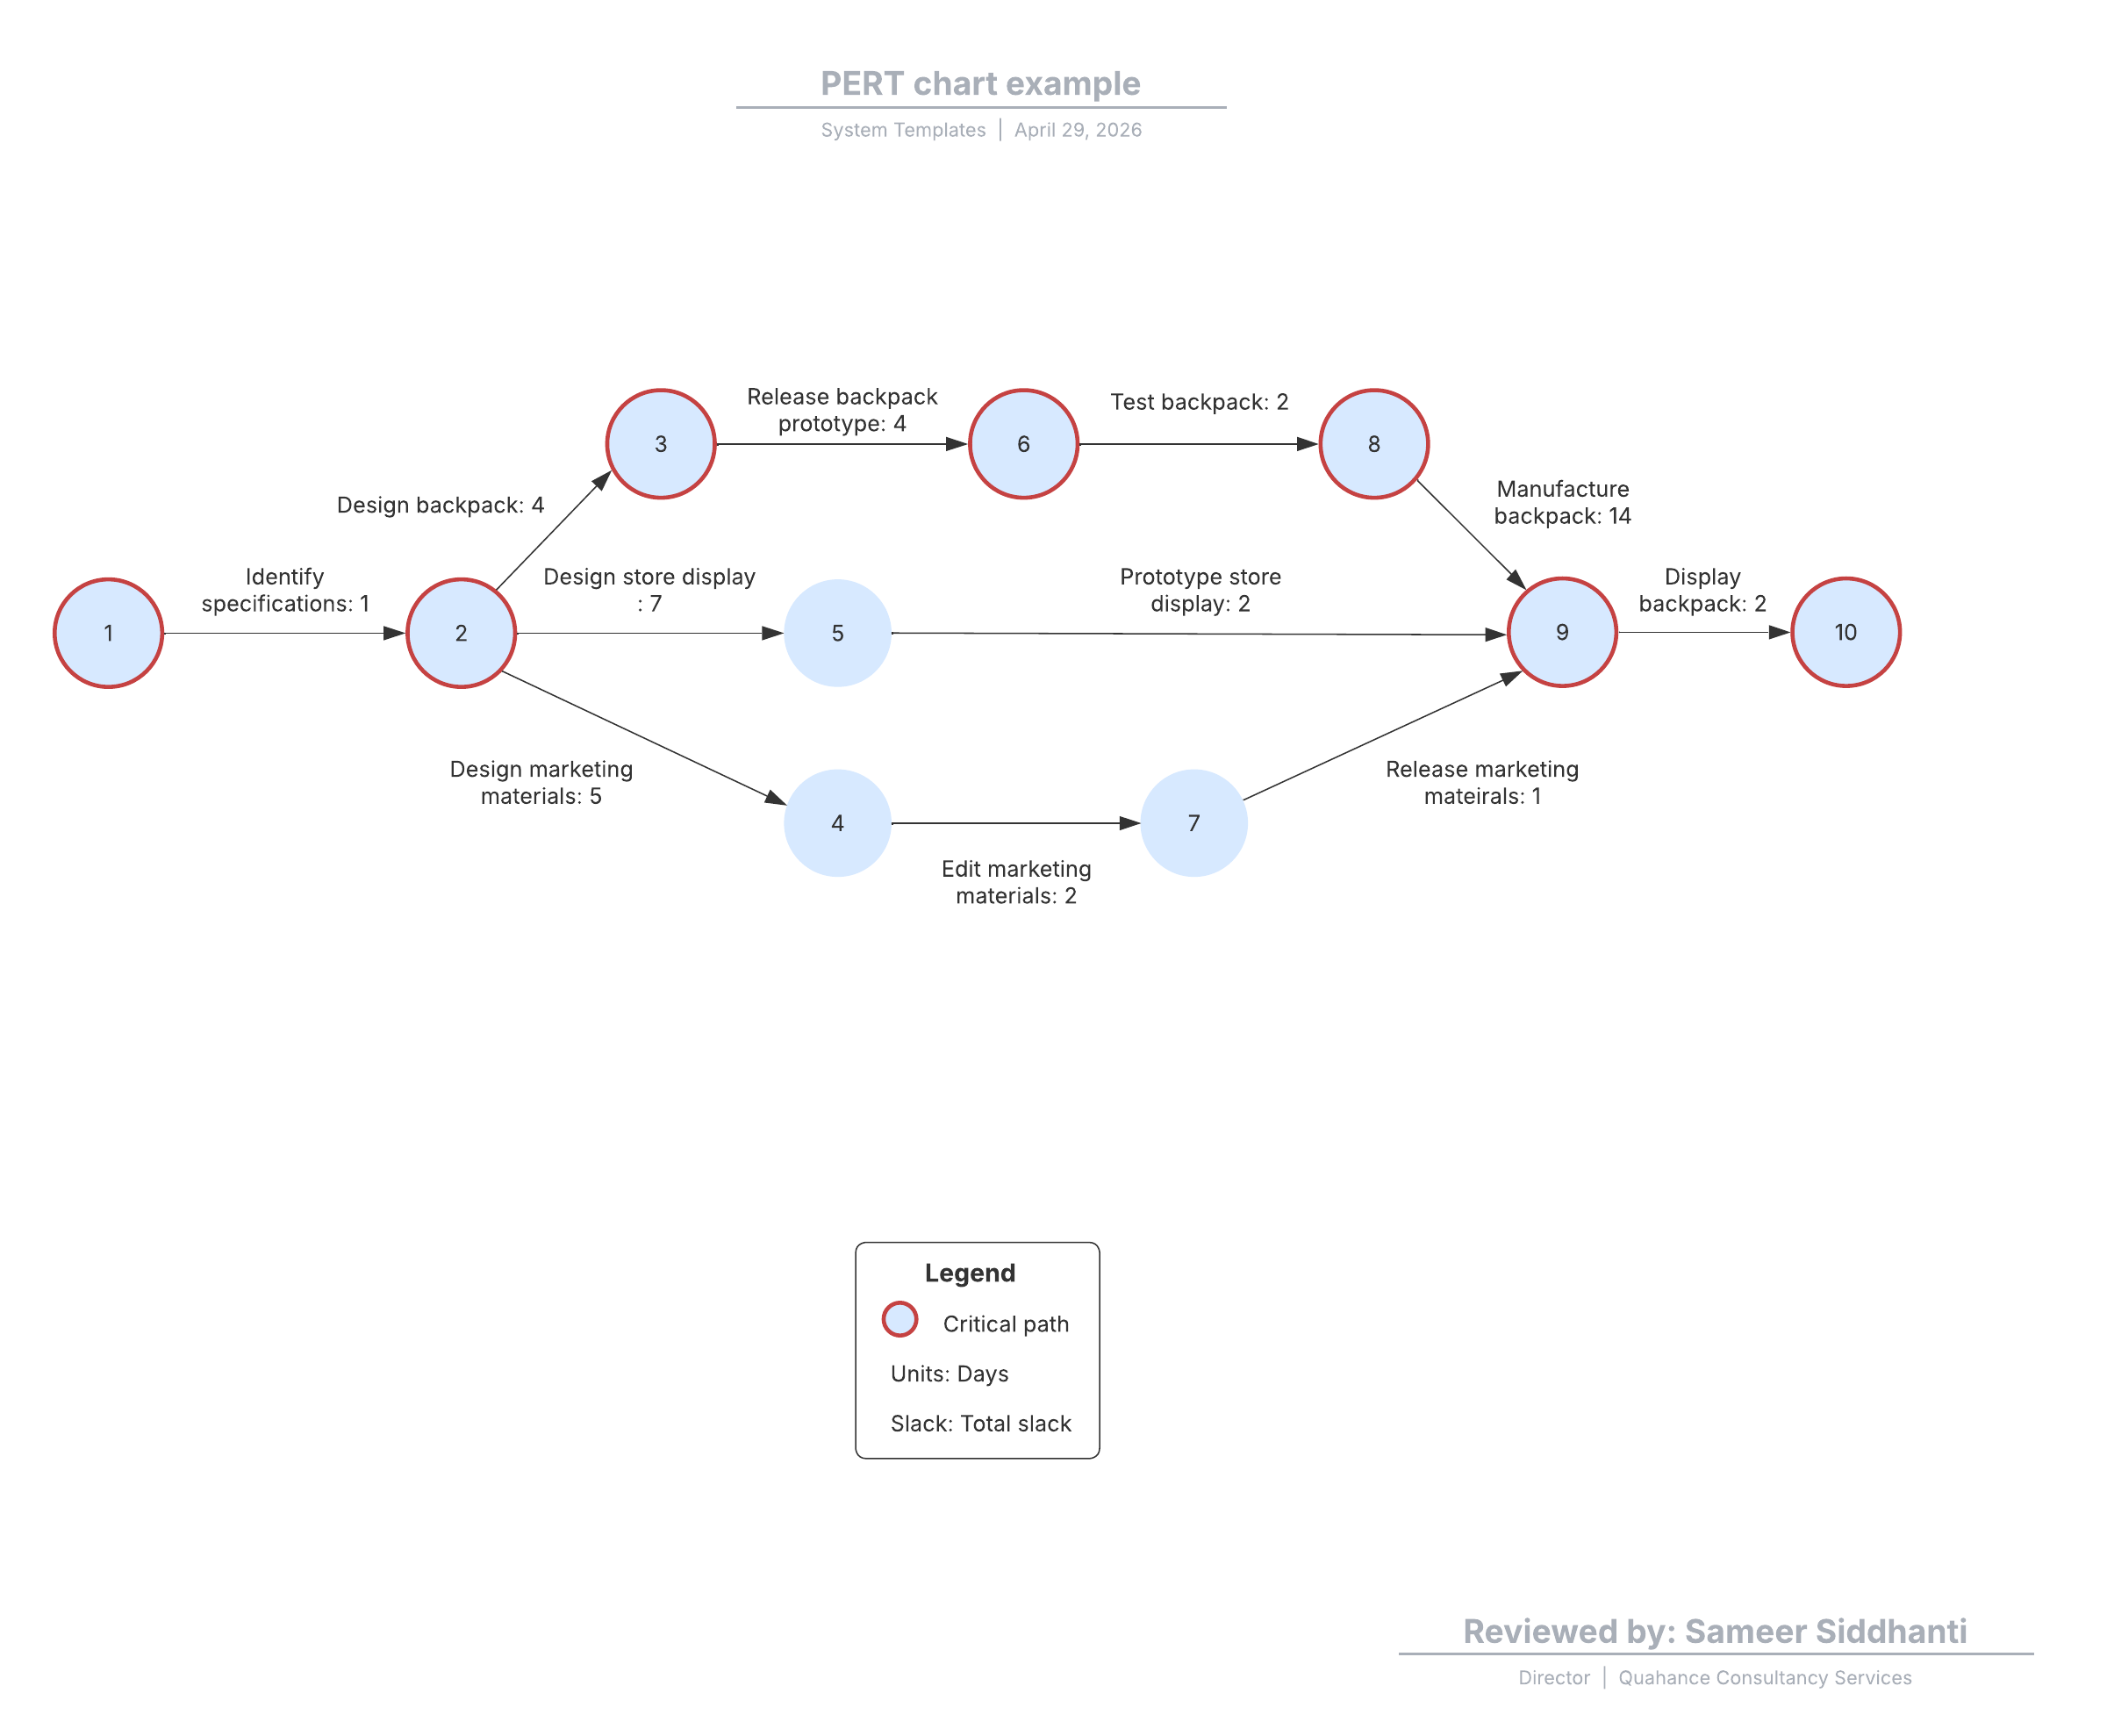
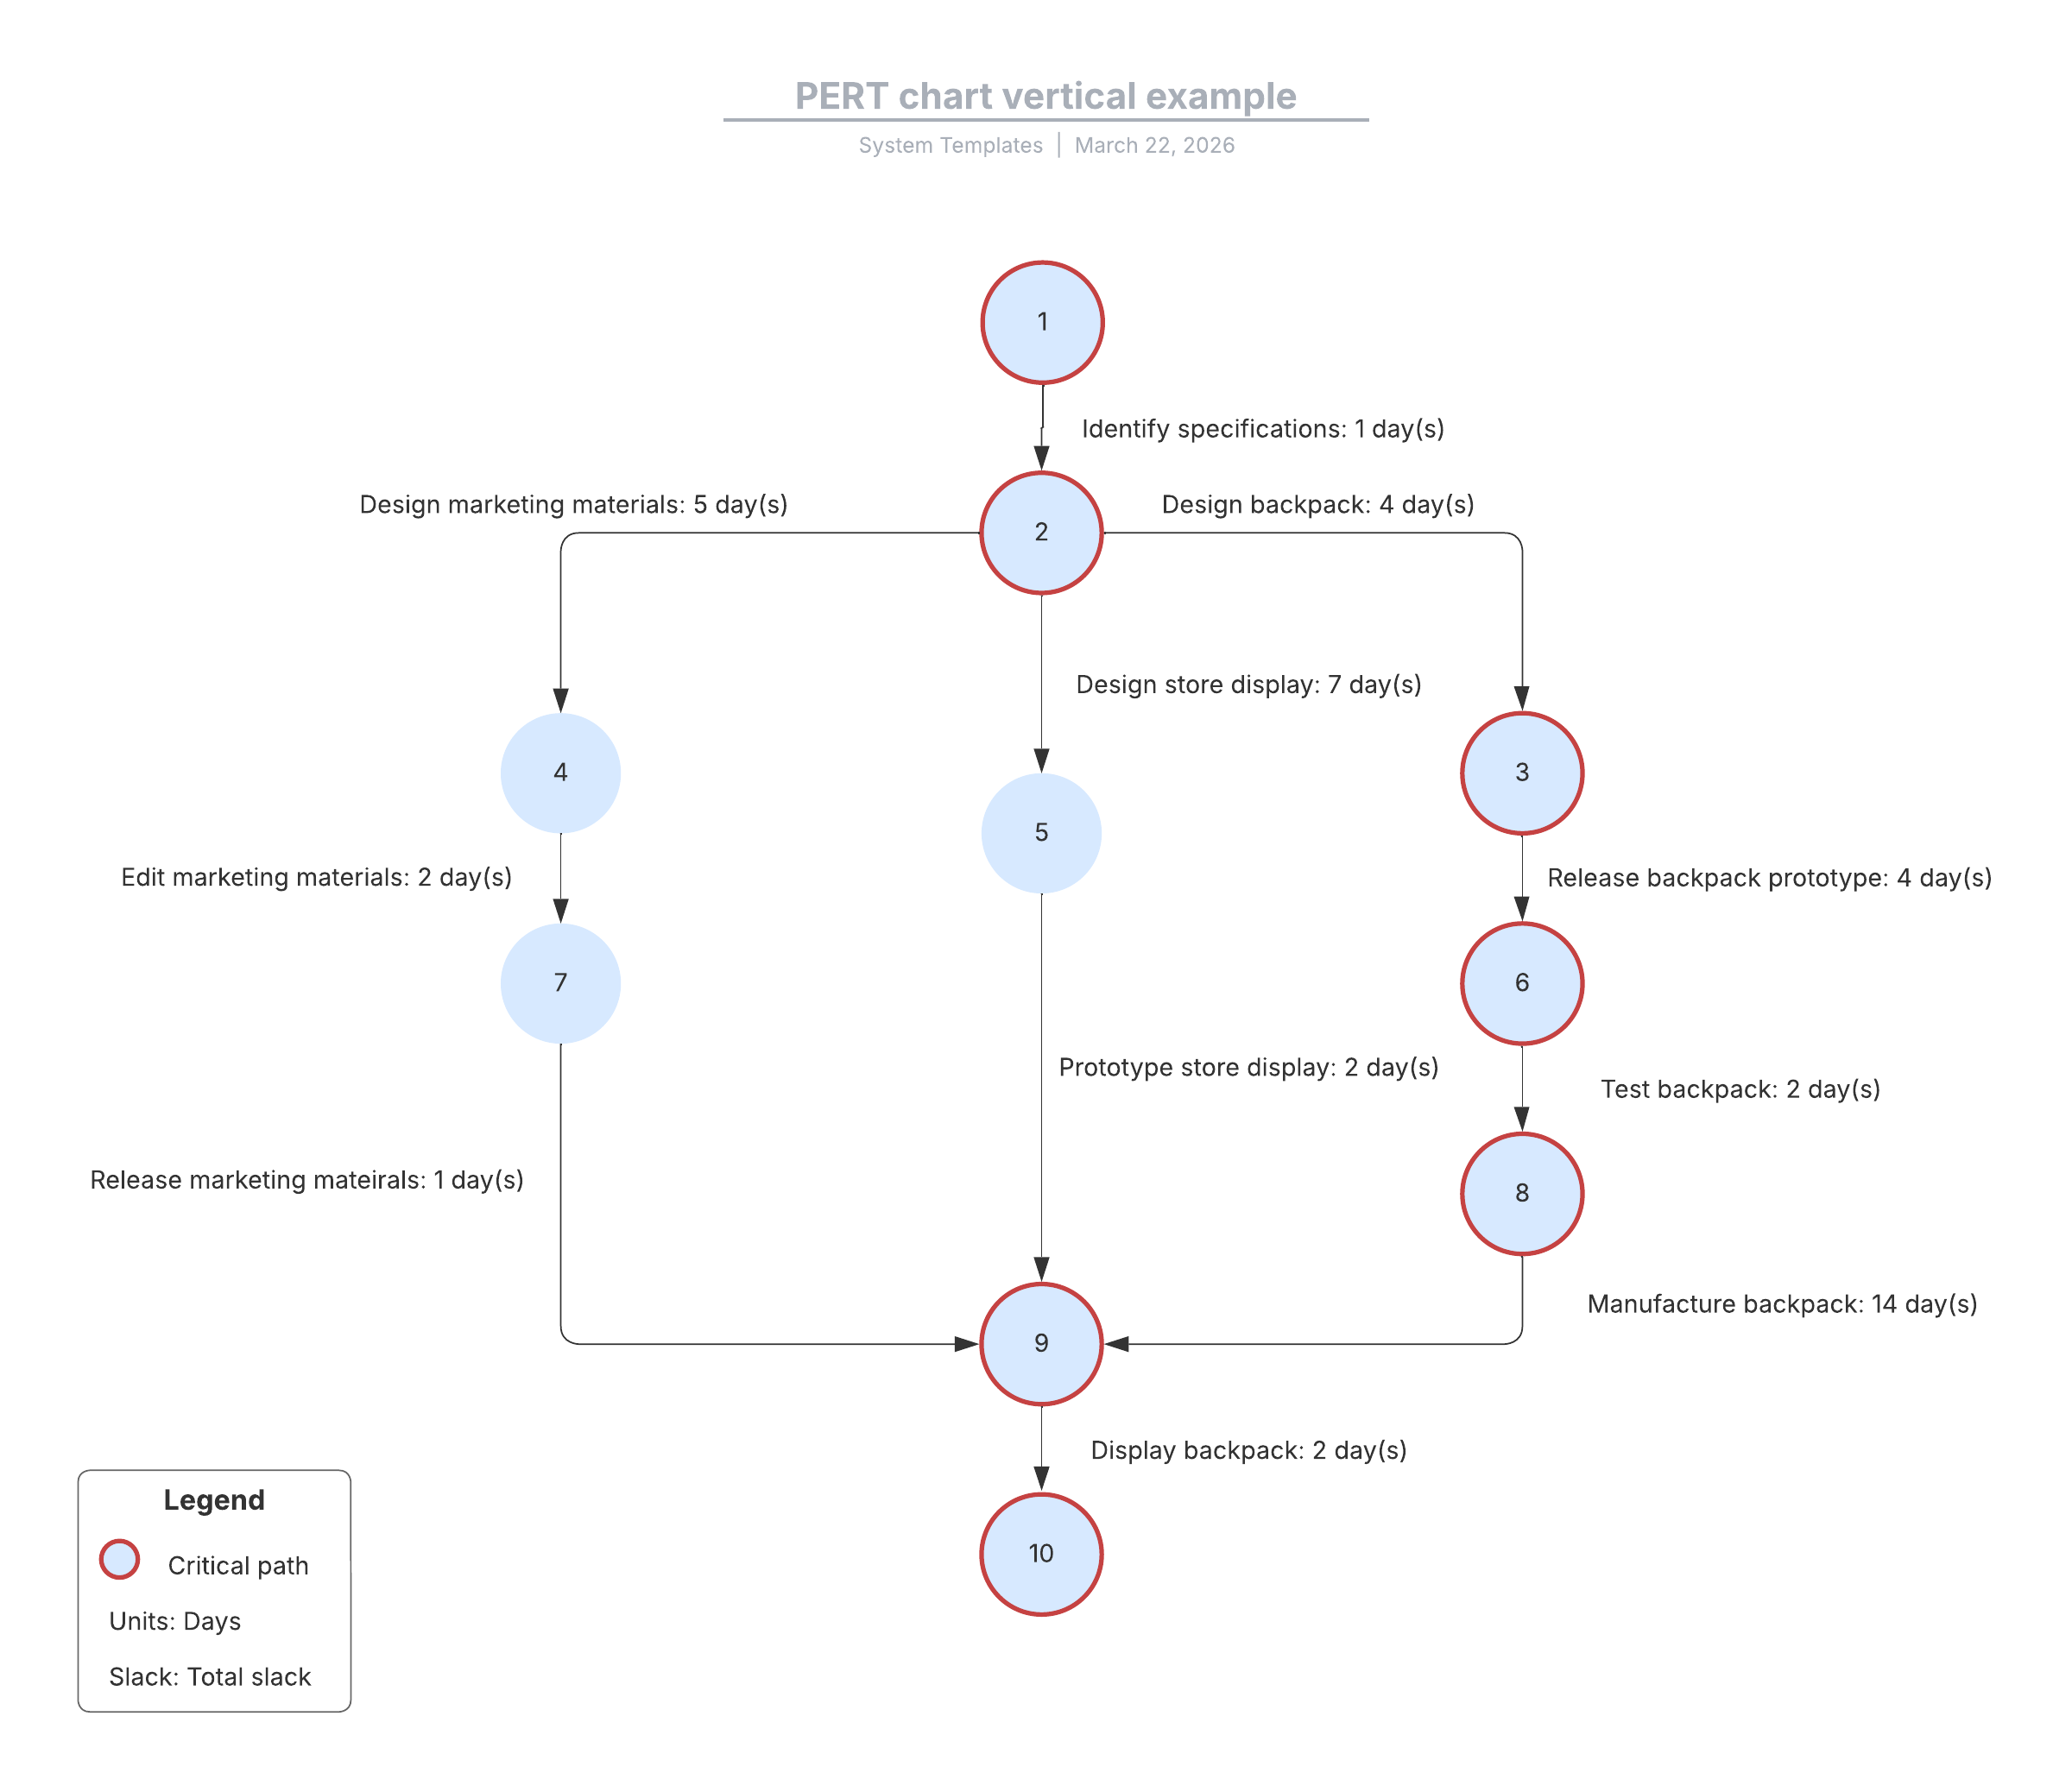
This comprehensive guide offers everything you need to know about PERT charts and the critical path method, including definitions, history, use cases, symbols, tips, and how to use our PERT chart generator to get you started. A well-organized PERT chart can help project managers effectively schedule and coordinate tasks within a project to estimate the time required to complete them.
Keep reading to learn about the benefits of using a PERT chart, as well as how to create and implement your PERT chart.
What is a PERT chart?
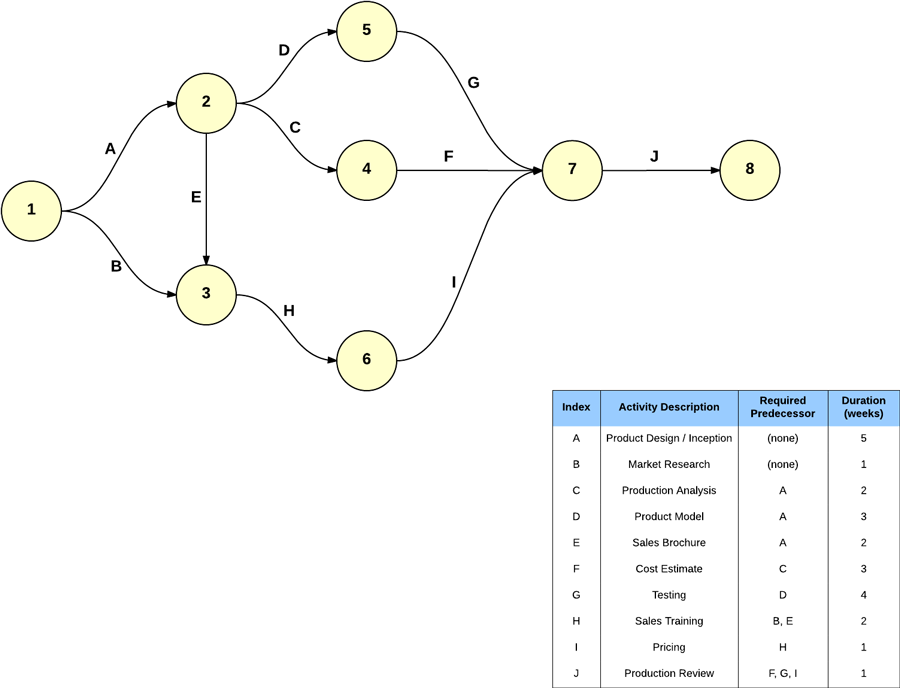
A PERT (program evaluation and review technique) chart is a project management tool used to analyze the individual tasks required to complete a project. Intended for larger-scale initiatives, PERT charts identify the shortest, longest, and most likely time requirements.
PERT charts provide a clear visual map of project timelines and inter-task dependencies, allowing you to make informed decisions about task sequencing, deadlines, and more. PERT reduces uncertainty and helps teams deliver results with greater clarity and efficiency.
Before building your chart, you must define the project scope: the full set of qualitative and quantitative requirements, including costs and customer needs. Once scoped, you can easily break the project into the specific steps and dependencies that PERT is designed to visualize.
PERT chart symbols, notations, and terminology
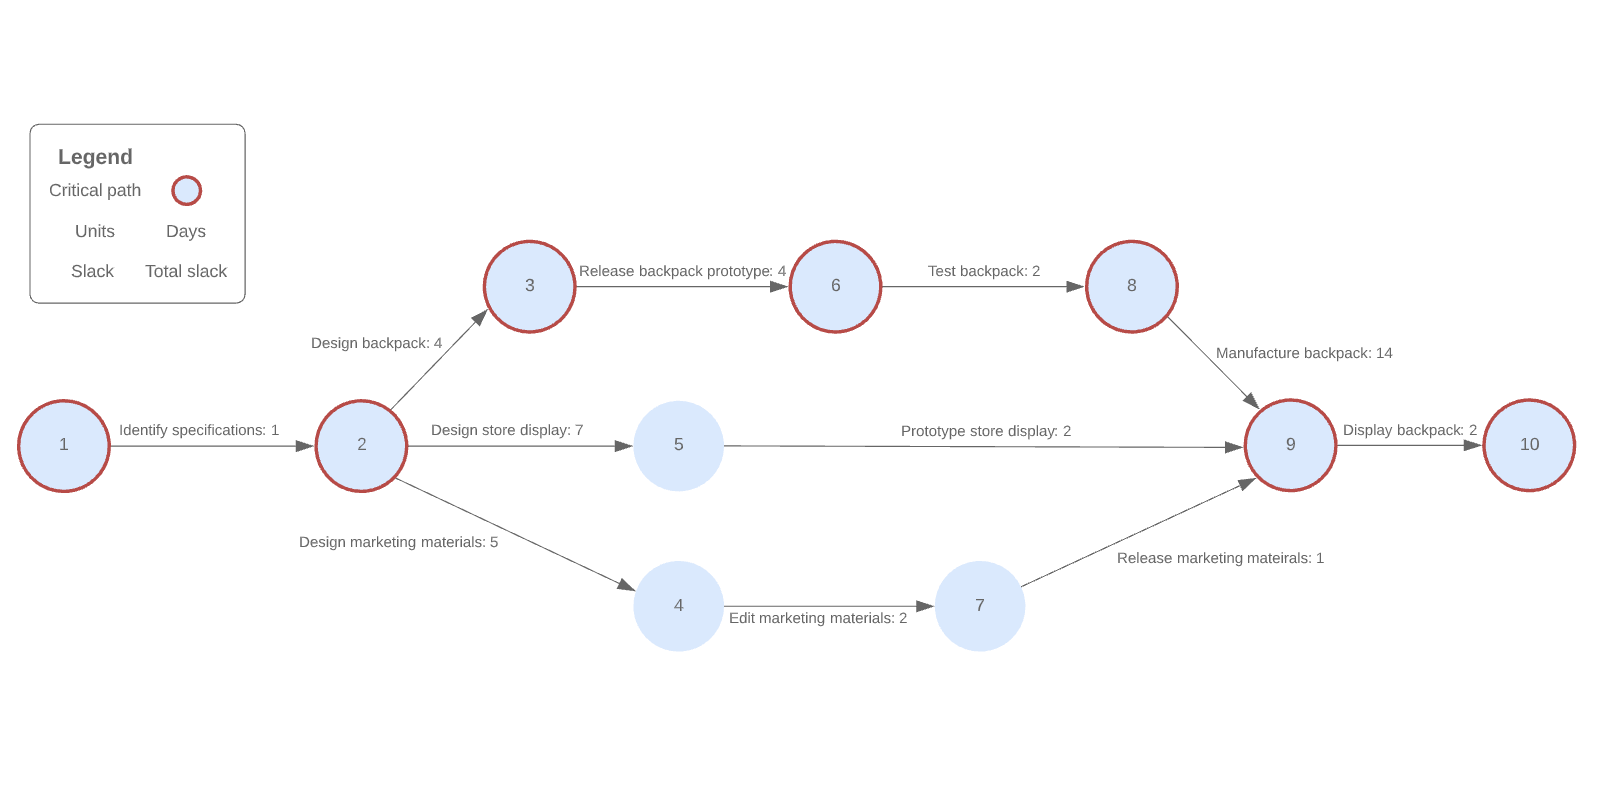
Here is a list of commonly used PERT chart symbols, icons, and terminology:
-
PERT chart: A chart that uses the symbols and notations of the program evaluation and review technique to depict the flow of dependent tasks and other events in a project
-
PERT event: A point in a PERT chart that marks the completion or start of one or more tasks. In many teams, "events" are also referred to as milestones or steps.
-
Predecessor event: An event that immediately precedes another event within your project without any other event intervening
-
Successor event: An event that immediately follows another event without another event intervening
-
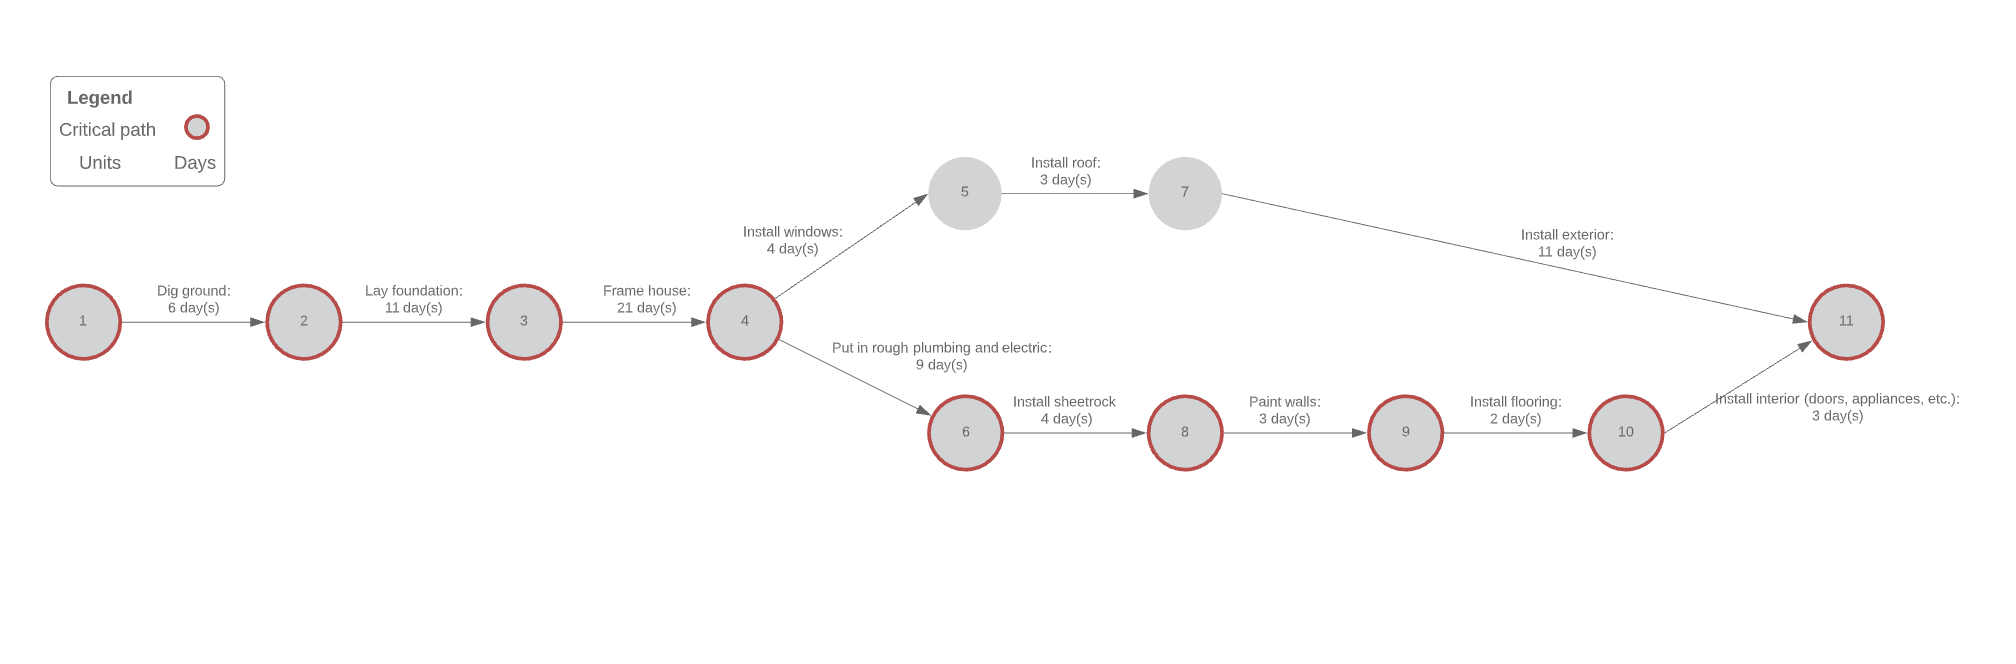
Critical path: The path between the first and last events in your project, including all your project's tasks and durations, that add up to the longest overall project duration. By identifying the longest possible duration, you can determine the shortest possible time to complete your project.
-
Critical path activity: Project tasks that must start and finish on time so that your project is completed on schedule
-
Crashing critical path: The act of adding additional resources to the project to complete activities and compress its schedule
-
Fast tracking: Project activities that were initially supposed to be completed sequentially but are performed simultaneously to save time
-
Lag time: The delay between tasks that have a dependency
-
Lead time: The time it takes to complete a task or a group of interdependent tasks
| Symbol name | Description |
| Terminator | Indicates start and end points |
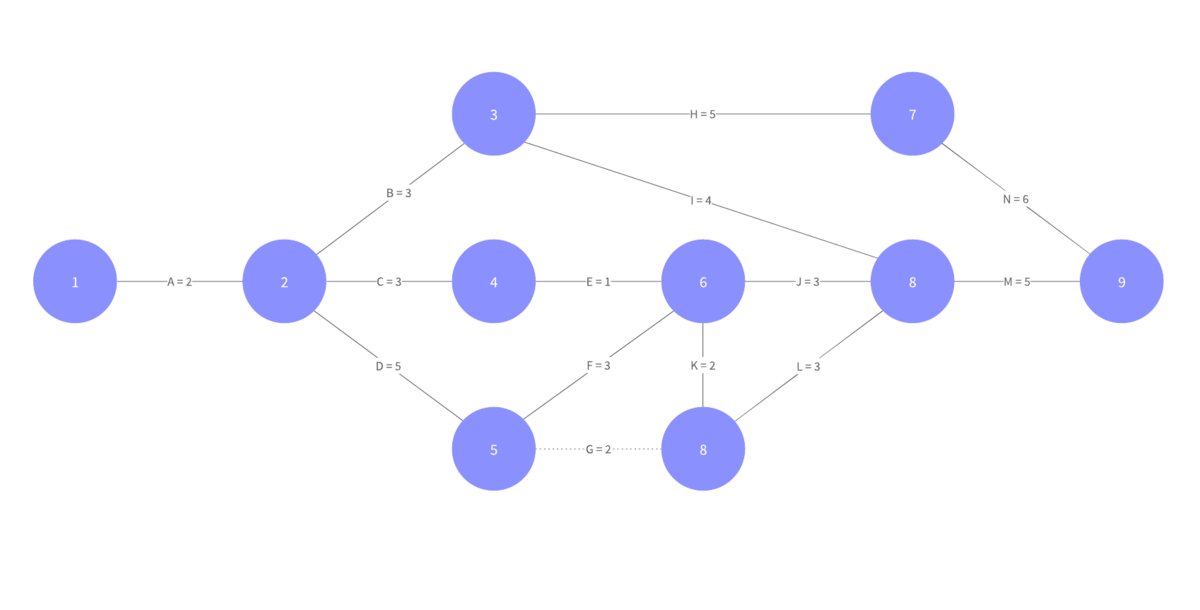
| Node (circular) | Used to represent events or milestones and contain numbers |
| Node (rectangular) | Used to represent events or milestones and contain numbers |
| Task (table) | Contains time estimations, projected start and finish dates, and the task owner |
| Line connector | Directional arrows used to depict dependencies sequentially |
| Dotted line connector | Directional arrows used to indicate dependencies that do not require resources |
| Lanes/containers | Used to separate the PERT chart into different zones, each representing different areas of the project |
How to make a PERT chart
While you can build your diagram from scratch, using a PERT chart template is the fastest way to jump-start your planning. Whether you start with a template or a blank canvas, follow these steps to map your project:
1. Identify your tasks
Create a thorough list of activities required to complete your project. PERT is most effective after you have finalized your scope or created a work breakdown structure (WBS), ensuring you have the granular detail needed for an accurate map.
2. Calculate time
Determine the optimistic, pessimistic, and most likely time frames of each task. These time frames explicitly account for variability and risk, particularly for unfamiliar tasks, allowing you to estimate the total project duration more accurately.
3. Build a project network diagram
Plug your tasks and time estimates into a visual timeline. As you map the work end to end, you may discover hidden dependencies that weren't obvious during initial scoping.
4. Prioritize high-risk calculations
You don’t need to apply complex formulas to every activity. Focus your detailed calculations on the riskiest or least familiar steps while documenting standard estimates for the rest of the plan.
What is the critical path method?
The critical path method (CPM), or analysis, was developed in conjunction with PERT. Both CPM and PERT techniques are used to manage projects within a specific timeframe. The critical path method calculates the longest path possible with your planned activities, then determines the time constraints for each activity. The project manager can then examine these paths and determine the steps to increase efficiency. Try using CPM for project management and scheduling—your organization will save time and money by adhering to its ultra-accurate estimates.
The difference between PERT and CPM
While both PERT and CPM prioritize task sequencing, they serve distinct project types. PERT manages uncertainty for unique, complex projects, while CPM optimizes cost and time for predictable, repetitive work.
Using both in tandem provides the most realistic deadlines and optimal process flow. However, consider these practical constraints:
-
Scale: For small projects, a PERT chart may be overkill.
-
Clarity: Exceptionally large diagrams can become so complex that they are difficult to interpret quickly.
-
Precision: PERT's variable estimates can make it harder to visualize a rigid deadline compared to CPM.
How to use the critical path method with PERT charts
Applying the critical path method in conjunction with PERT charts can truly elevate how you manage projects and provide realistic deadlines and process flows.
Visualize your project in a PERT chart, and in the last step, use the CRM to estimate the times of completion for your tasks. When creating a PERT chart, you're going to give rough estimates for each task or scenario. You should estimate both the longest and shortest times each activity is likely to take. You'll even want to take delays into account and estimate the longest potential task durations if there are chances of any setbacks.
With this information, you can now dive deeper into the process for individual tasks, identify potential ways to reduce time, or get an exact estimate of how long it will take moving forward.
The PERT formula and when to use it to estimate expected time
There are several variables that can affect task completion, making it difficult to estimate how long a project will take. PERT chart users typically rely on four standard calculations when determining the appropriate length of their projects:
-
Optimistic time (O): The least possible amount of time required to accomplish a task
-
Most likely time (M): An educated estimate of how long a task will take to complete without problems or delays
-
Pessimistic time (P): The maximum amount of time required to accomplish a task
-
Expected time (E): A reasonable estimate of how long a task will take to complete, taking into account possible problems or delays
The basic PERT estimate equation used to determine your expected time is E = (O + 4M + P)/6.
Once you have identified each time estimate, you can plug them into the PERT formula to more effectively calculate a project's duration.
Let's demonstrate with a simple house remodel. If your optimistic time estimate is 160 days, your pessimistic time estimate is 365 days, and your most likely time estimate is 200 days, your equation will look like this:
E = (160 + 4 x 200 + 365)/6
So, you can estimate that your home remodel will be complete in approximately 221 days.
If you prefer a smaller-scale example, the same weighted-average approach works for short tasks as well. For example, say you estimate a step to take about 12 hours of work. If everything goes right, the step could be completed in eight hours. If you run into multiple delays, it could take 28 hours. Plug those figures into the chart:
Estimated duration = 8 + 28 + (4*12)/6 = 14
So now you know that your step is likely to take about 14 hours to complete.
Note that the "most likely" estimate is weighted more heavily than the optimistic and pessimistic estimates, which is why PERT can be more realistic than a simple average when uncertainty is high. Each number (o, p, and m) holds a weighted average of 16.66% each.
How to conduct a PERT analysis
A PERT analysis is used to determine the probability of your project being completed on time. To conduct a PERT analysis, use standard deviation to determine the amount of variation in your data.
The formula for standard deviation is: (P - O)/6
The lower your standard deviation, the more confidence you can have in your expected completion date.
With PERT, you'll also be able to more accurately predict a feasible deadline for your project. PERT is a fantastic method for project management when there's a high degree of uncertainty, as it provides built-in flexibility to account for potential issues.
Advantages of using a PERT chart
PERT charts can be helpful when tackling non-routine or time-sensitive projects with many task dependencies.
Using a PERT chart can:
-
Clarify time constraints for your team.
-
Offer a detailed view of the sequence in which tasks should be performed.
-
Help you manage your time and resources across your team more effectively.
-
Reduce waste and costs as you complete your project.
-
Potentially speed up a project's completion by allowing for overlapping tasks to be identified and initiated.
-
Allow you to easily visualize and organize a complex project.
Perhaps the biggest benefit of using a PERT chart is the potential for higher worker and client satisfaction. When used effectively, the contextualized data in PERT charts can simplify the decision-making process and provide your team with a sense of accountability regarding project requirements. This means less stress, fewer missed deadlines, and more time to get to your next project.
PERT can also help teams spot opportunities to overlap work safely (when dependencies allow), which can shorten the schedule or create buffer time for inevitable delays.
What is the difference between a Gantt chart and a PERT chart?
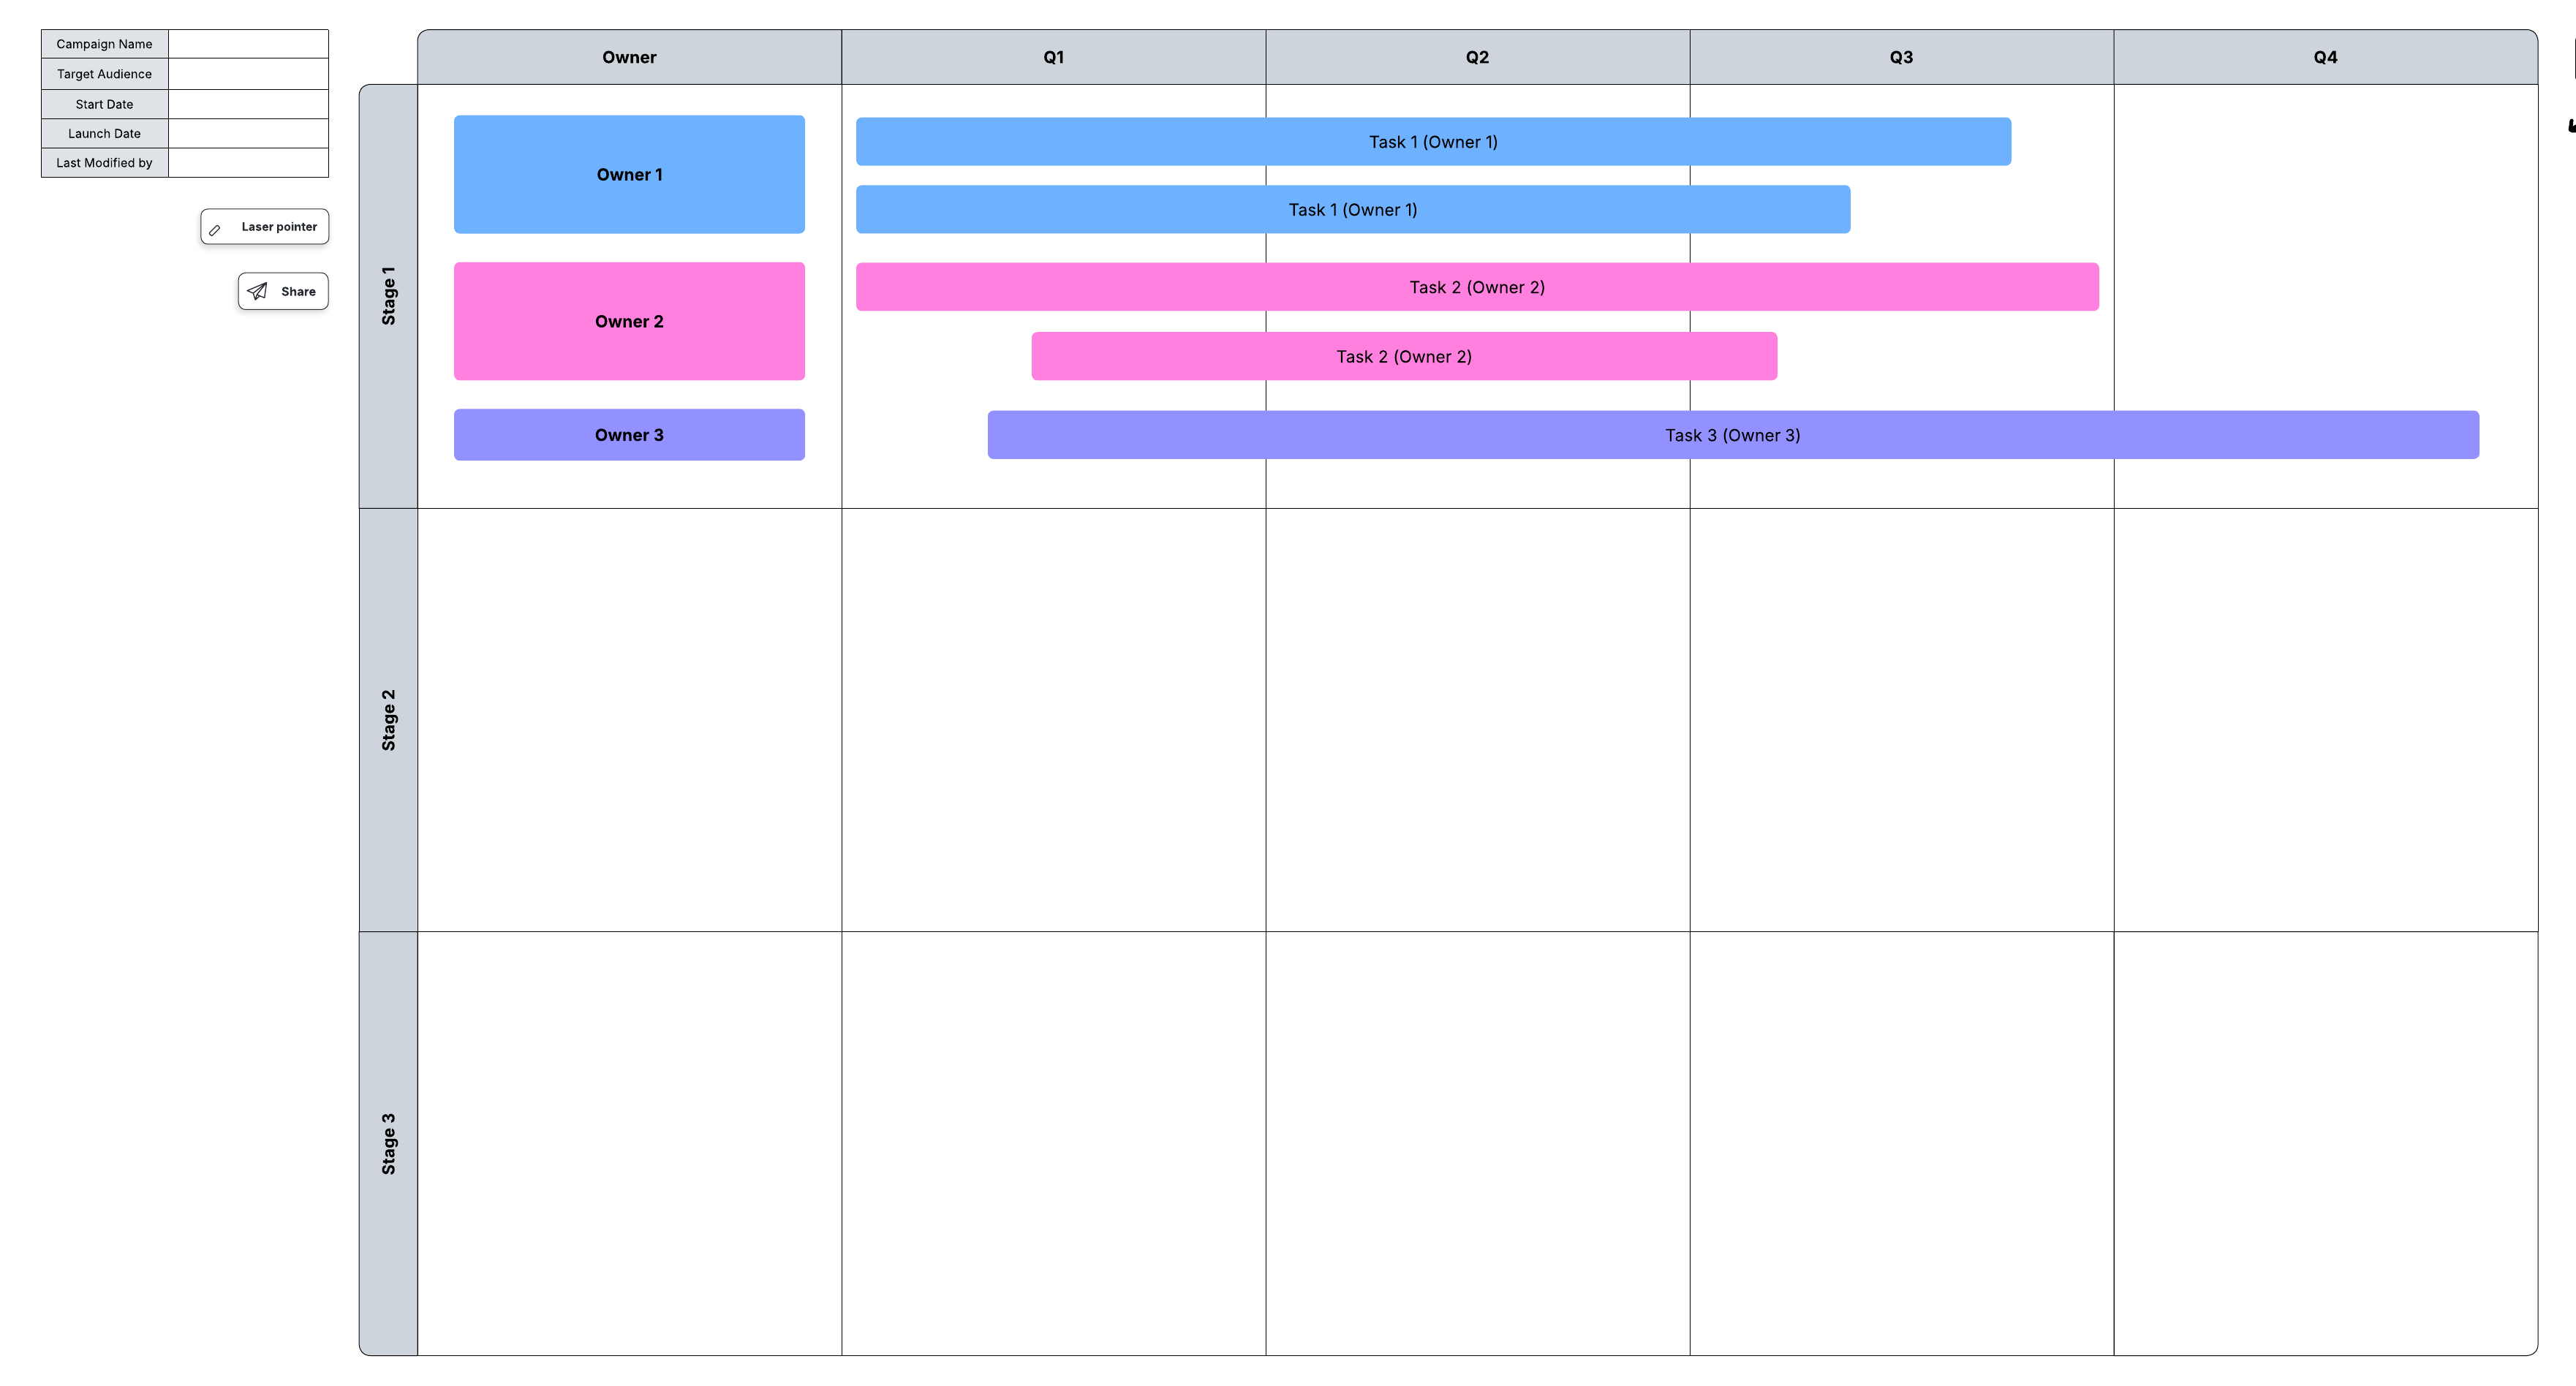
Both PERT charts and Gantt charts are visual tools used for project management, but there are a few notable differences between the two. Most importantly, PERT charts are more commonly used before a project begins to break a larger project into smaller tasks, while Gantt charts are used during a project to schedule tasks by date and depict how much work has been completed.
Consider using a PERT chart rather than a Gantt chart if you want to visualize interdependencies, determine your project's critical path, or accurately estimate your project's duration.
Fast-tracking projects
Fast tracking is a common schedule-compression technique that becomes easier once your PERT network is visible. By mapping your project, you can identify which tasks can overlap or run concurrently to speed up completion or create a buffer for potential delays. However, don't fast-track your project until you can see which predecessors must be completed first; otherwise, a step may start concurrently and then be delayed while waiting for another step to complete.
Ready to get started? Sign up for Lucidchart to create a PERT chart and streamline project planning.
Everything you need to make a diagram
Make a polished, professional diagram for free with Lucidchart. No matter what you have in mind, we have the tools you need to build it. Make an account and start diagramming today.
Sign up free